Recently I've been on a "kick" to get rid of some of the junk that clutters up our life and our house. When it comes to this type of thing, I tend to get into two different moods (which completely contradict each other by the way).
Mood #1: I focus in on something that I dislike about a room in my house. A simple "that window needs a window treatment" snowballs into a complete room makeover. I decide that I simply don't have enough cute objects to decorate my new space with, or I see something on a blog/Pinterest that I can't live without. I shop all over Eastern PA and I.MUST.FIND.CUTE.STUFF is all I think of day and night. True story, just keepin' it real.
Mood #2: I need a gift bag for a birthday party so I head down to our small storage space in the basement which is where we keep items of that nature. I open the door and can't even walk one step into said small storage space because there's simply WAY too much stuff in there. I then get obsessed with getting rid of each and every item in the ENTIRE house that isn't useful to us anymore. (During this mood, nothing is safe. Better nail it down if you want to keep it folks!)
These moods are very cyclical, and I happen to be at the tail end of Mood #2 at the moment.
A few days ago I felt myself shifting back to Mood #1. I saw something on a blog that I really wanted to try and I was planning a "quick" trip to the local craft store to buy the necessary items to make it.
Then, I read a post on a favorite blog of mine that stopped me dead in my tracks. Here is what it said:
Hello. Nice to meet you!
What do I do? Oh, I’m a Stuff Manager.
Gosh, no, I don’t really like it but, isn’t that what everyone does?
My daily routine involves looking through my stuff, putting stuff away, organizing stuff, feeling guilty because I haven’t organized other stuff, fussing at my kids because their stuff isn’t put away, wading through misplaced stuff in our garage, piling up stuff I’m tired of so we can sell it, packing away stuff I’m really tired of to give it away, asking my husband where he put his stuff, sorting, washing, and drying our stuff, and then dreaming about more stuff that I want and the bigger house I “need” because my precious stuff won’t fit in our current house–I guess it’s too small.
I never planned on being a stuff manager, it just kind of happened and now that’s my job. Oh, gosh no, I don’t get paid for it. I just do it because I think I have no other choice. I have a whole other job that I get paid for and I use most of that money to buy more stuff. I’m training my kids to be stuff managers too.
Wow. That is so totally and completely true.
BAM! Right back to Mood #2 I went and I now have a renewed focus to use what I already have on hand and not add any more junk to my life.
So what I wanna know is......Do you have "Moods" that flip flop too? Or are you always a Mood #1 or Mood #2 and you just don't ever switch? I'd love to know!

Thursday, October 11, 2012
Friday, October 5, 2012
Halloween mantel - 2012
I took some time the past few days to work on decorating my mantel for Halloween. Halloween is one of my favorite holidays to decorate for, and we have TONS and TONS of decorations to show for it, but let's just say most of it is "orange overload".
So this year I decided that less is more, and that I wanted a more muted and toned down mantel with natural colors and elements, as well as some handmade elements, mixed in.
Here is what I've done so far....

The owl and book I already had, the two silver plates on either end I picked up at the thrift store for a couple of bucks. The plant was already there and I liked the greenery and natural element that the basket added, so I left it.

Watch out for the sneaky crow hiding in the bush. I've heard he has a temper.

I made myself a set of "BOO!" blocks, and I love them! And of course, a sad little black bird on a plate always makes me think of Halloween. HAHA!!!

A couple of old spools (another thrift store find), a spooky old tree, and a little handmade garland (book pages stapled to twine...couldn't be easier) finish it off!

I really wanted to make some sort of handmade wreath to go over the mirror, but I haven't been able to carve out the time to do it yet. If I don't get to it soon then I'll just utilize my motto..

There's always next year!
Sunday, September 30, 2012
Using what you've got....
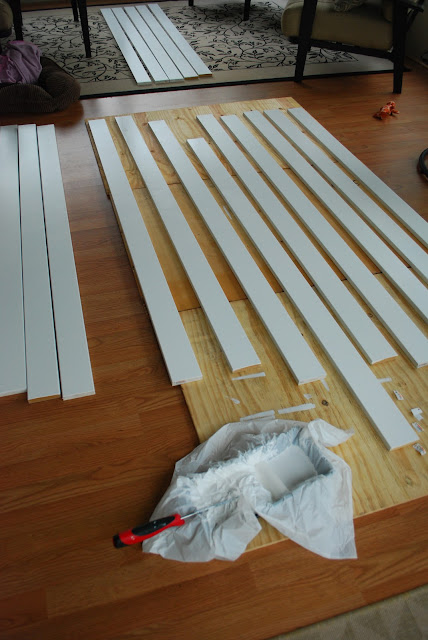
Sometimes, when the crafty bug strikes your 14 month old baby is hungry, your oldest daughter is working on a school project, and your "littlest-middlest" (which is what I call my younger daughter) has a sinus infection. During those times, you can't always run out to the home improvement store or the craft store and you just have to use what you've got!
A few weeks ago when Ron and I did this project above the fireplace:
We had a ton of this wood left:

Ron (aka Mr. C) kinda likes to clean up and doesn't have a crafty bone in his body....so he was all,
I'm gonna throw this stuff out.
And I was all,
Over my dead body!
So I squirreled them away in a corner of the garage not knowing what I would ever do with em'. Till tonight....when I felt the familiar sting of needing some "crafty time". Here's what I did:
I had Mr. C cut them into small squares for me, then I painted them white. I cut some letters from my trusty Cricut in a font I liked and in a size that would fit on the block.

I lightly traced the letters with a pencil,

Then filled them in with acrylic paint.

You can either leave them "as-is" for a crisp clean look or......

You can distress the edges and flick some paint on them to give them a creepy, ghoulish look for Halloween!

I love how they turned out, and for the price of FREE you really can't beat it!
I am Mrs. Cheapskate and I approve this message.
I'm linking up to the following:


Saturday, September 29, 2012
The .25 cent artwork that almost never happened
I'm one of those people that sees a cool project all over Blogland and Pinterest and I always think,
Then, I read about the project and everyone says how EASY and FAST the project is.
Then, after seeing how EASY and FAST that particular project is on 10 different blogs I say to myself,
Cause lets be real, if a project isn't easy I usually don't do it. And if you tell me straight up how loooooooong it took you, I for sure won't do it.
So I've seen these really cool tutorials about freezer paper stenciling all over the place and I've tried it on fabric (which works WONDERFULLY). It really is pretty EASY and sort of FAST. I've also seen some cool artwork numerous different places with the saying "You are my sunshine", and I filed it away in the crafty folder in my brain (do you have one of those?) and decided that I wanted to do something like that, but on the cheap.
I'm crazy cheap. In case you didn't know.
I hit up a local flea market and bought this picture and frame for .50 cents. That's cheap enough even for this cheapskate.

I removed the picture from the frame and painted over it with white acrylic paint. EASY.


I then cut out letters for the saying on my Cricut with freezer paper. FAST. At this point I was impressed by how EASY and FAST this project was going, and I attempted the freezer paper technique on the picture.This is where things went totally awry. Apparently, freezer paper sticks really well on a whole bunch of surfaces, but acrylic paint is NOT one of them.
As I was ironing the letters on, the other letters were peeling right off. What was supposed to be an hour long EASY and FAST craft turned into an epic 6 hour battle of the cheapskate vs. the freezer paper.
I have no "during" pictures. No beautifully written step by step tutorial where it all ties in together and you think to yourself,

P.S. I changed the saying up a bit to fit in with the amount of children running around in this household. With three kids, I kind of felt like saying "YOU are my sunshine" would cause one of them to feel superior to the others and might leave the other two feeling like they aren't my favorite. The only time I show favortism in this house is when one of em' has some sort of ice cream or candy that I want to get my hands on. Then its GAME ON! (I kid, I kid.)
Linking up to:
http://bec4-beyondthepicketfence.blogspot.com/ " target="_blank">
http://i454.photobucket.com/albums/qq266/bec8257/button2.jpg"/>>
Wow. That looks hard.
Then, I read about the project and everyone says how EASY and FAST the project is.
Then, after seeing how EASY and FAST that particular project is on 10 different blogs I say to myself,
Well, if its that EAST and FAST then I'm sure I can do it.
Cause lets be real, if a project isn't easy I usually don't do it. And if you tell me straight up how loooooooong it took you, I for sure won't do it.
So I've seen these really cool tutorials about freezer paper stenciling all over the place and I've tried it on fabric (which works WONDERFULLY). It really is pretty EASY and sort of FAST. I've also seen some cool artwork numerous different places with the saying "You are my sunshine", and I filed it away in the crafty folder in my brain (do you have one of those?) and decided that I wanted to do something like that, but on the cheap.
I'm crazy cheap. In case you didn't know.
I hit up a local flea market and bought this picture and frame for .50 cents. That's cheap enough even for this cheapskate.

I removed the picture from the frame and painted over it with white acrylic paint. EASY.


I then cut out letters for the saying on my Cricut with freezer paper. FAST. At this point I was impressed by how EASY and FAST this project was going, and I attempted the freezer paper technique on the picture.This is where things went totally awry. Apparently, freezer paper sticks really well on a whole bunch of surfaces, but acrylic paint is NOT one of them.
As I was ironing the letters on, the other letters were peeling right off. What was supposed to be an hour long EASY and FAST craft turned into an epic 6 hour battle of the cheapskate vs. the freezer paper.
I have no "during" pictures. No beautifully written step by step tutorial where it all ties in together and you think to yourself,
Well, if its that EAST and FAST then I'm sure I can do it.
Nope. What I have is a finished project that I will NEVER.EVER attempt to do again. I'm semi-happy with the outcome (some of the letters are wonky, but if you knew how hard it was to even get them on there then wonky would be completely acceptable), and I'm totally glad that its over. I'll use the chunky frame that came with it on another project, hopefully one that doesn't take me 6 hours.

Linking up to:
Wednesday, September 12, 2012
Fireplace then and now
Just this last week my husband and I tackled a few projects around the house that have been on the 'list" for a little while and needed to get done. You know the "list" I'm talking about...right? The one every home owner has that's a mile long and that you will never ever get to throw away because as soon as you cross off one or two items that get done, they get replaced by about 5 or 6 more. Yep...that's the one.
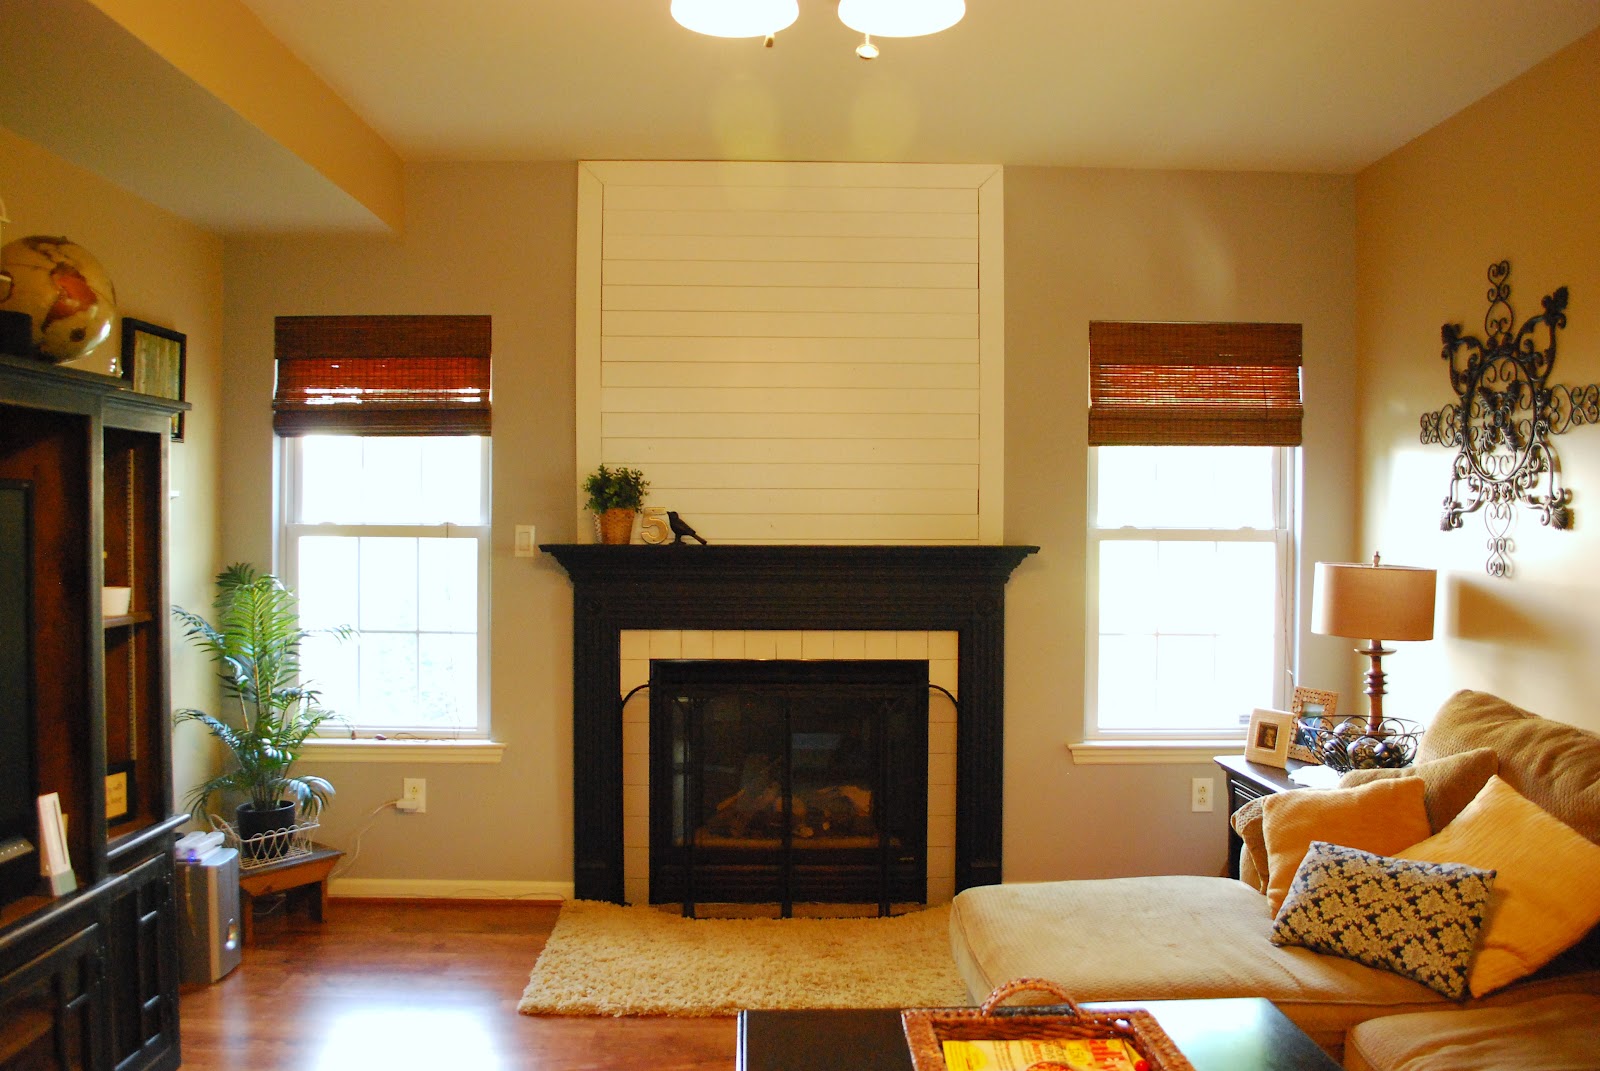
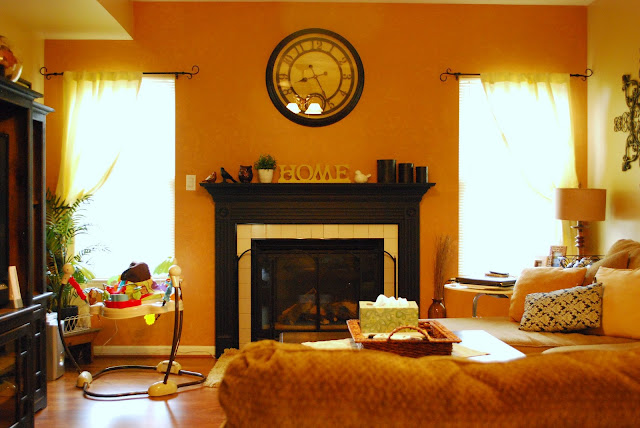
So one of the projects we did was to update the wall that our fireplace is located on (in our Family Room). The wall has been bare and painted the same color for over 10 or 11 years, so it was time to make a change. Please forgive this terrible BEFORE picture, it was the only one I could find...but it still gives you an idea what it was originally like.

A few years ago I decided to paint the fireplace black, here's a pic of that.
I loved the way it looked but knew it needed something else. I wanted to add interest to the fireplace to help make it more of a focal point in the room, instead of just another floating piece of furniture. At first I thought we would do rock or tile above to the ceiling, but that didn't feel "right". Then I thought maybe I would do some sort of paint technique up there but again, that didn't really make me jump for joy. Then it hit me as I was browsing one of my favorite blogs. She did a wood technique above her fireplace that I absolutely LOVED and it was exactly what my fireplace needed! Here's the DURING and AFTER.....


Here's what we did. We painted the wall a pewter/grey color, added the wood detail above the fireplace, removed the old window treatments, and added the bamboo shades. The cost: paint was $25 for a gallon (which we used very little of on this wall then saved the rest for another project in another area of our house.... which I'll share soon), the shades were $31 each at Home Depot, and the wood was around $50 (also at Home Depot). This project came in well under $150.
Of course the room isn't done yet. I'm trying to decide on window treatments, what to hang on the new wood wall, and of course how I want to decorate the mantel for Fall. What a difference changing one wall in this room made!
Linking up to:

So one of the projects we did was to update the wall that our fireplace is located on (in our Family Room). The wall has been bare and painted the same color for over 10 or 11 years, so it was time to make a change. Please forgive this terrible BEFORE picture, it was the only one I could find...but it still gives you an idea what it was originally like.

A few years ago I decided to paint the fireplace black, here's a pic of that.

I loved the way it looked but knew it needed something else. I wanted to add interest to the fireplace to help make it more of a focal point in the room, instead of just another floating piece of furniture. At first I thought we would do rock or tile above to the ceiling, but that didn't feel "right". Then I thought maybe I would do some sort of paint technique up there but again, that didn't really make me jump for joy. Then it hit me as I was browsing one of my favorite blogs. She did a wood technique above her fireplace that I absolutely LOVED and it was exactly what my fireplace needed! Here's the DURING and AFTER.....
(Painting the wood for above the fireplace. Lots and lots of painting....)

(the wall is painted, the frame is UP!)

(All done....well.....not really. But already MUCH better!)

Here's what we did. We painted the wall a pewter/grey color, added the wood detail above the fireplace, removed the old window treatments, and added the bamboo shades. The cost: paint was $25 for a gallon (which we used very little of on this wall then saved the rest for another project in another area of our house.... which I'll share soon), the shades were $31 each at Home Depot, and the wood was around $50 (also at Home Depot). This project came in well under $150.
Of course the room isn't done yet. I'm trying to decide on window treatments, what to hang on the new wood wall, and of course how I want to decorate the mantel for Fall. What a difference changing one wall in this room made!
Linking up to:
Tuesday, August 21, 2012
Thrift store tray - before and after
I was browsing at my local thrift store, not looking for anything in particular, when I spotted this wooden tray. It had a nice shape and for $1.00 I couldn't pass it up.
Have I mentioned before how much I love thrift stores??? Yeah, I thought so.
BEFORE:

I brought it home and decided it needed to be spruced up a bit, so I painted it and added a number 5 to it (which is significant because it represents the number of people in our little family. My husband, myself, and our 3 wild and crazy kids). I have a few 5's placed randomly around my house, so this will fit right in with the others.
AFTER:

Here's what I did to make the tray all purdy:
First I gathered my supplies. I cut the number 5 out of my Cricut using plain cardstock (I needed to cut 2 or 3 to get just the right size). Not pictured is the white paint that I used or the masking tape.

I removed the price tag and painted a very thin first coat of white paint on it. Let it dry for a few minutes.

After the first coat was almost dry I put a thicker second coat on. Don't try to do it too perfectly, a little imperfection gives it character. I may even distress it a little bit later on to make it look a little "weathered".

When the paint is totally dry, tape your number to the center with masking tape (if you don't wait for it to completely dry then when you take the tape off it will remove some of the paint). Remember...this isn't the most terrible thing to happen if you like that look!!

Paint with a contrasting color. Here's the thing about stenciling.....you can't put a lot of paint on your foam brush or it will bleed under the stencil. You wanna have so little on there that it takes a while to fill in. That's how you get crisp lines.

Last but not least....pull off the stencil and tape, let dry, then stand back and admire your beautiful $1.00 thrift store find. No one would guess how little it cost!!

Sunday, August 19, 2012
Patio floor redo with AFTERS
So here they are.....before, during, and after pics of our patio floor redo.
Looking at these pics I'm SHOCKED at how bad the floors were before...it was one of those things that I think I just ignored for so long. I think I have a few of those areas in my house.... do you?
Now that its done I love it, and what makes it even sweeter is the fact that this entire project cost UNDER $10!!! My husband did the work (free labor is SA-WEET!!) and by using the reclaimed wood floors and molding that we removed from our family room, all we needed to purchase was three extra molding pieces (a few of them broke during removal and also because this room is larger than our family room). Gotta love a cheap project that doesn't cost an arm and a leg to do!!
Now if you'll excuse me, I need to go relax, read, and drink some coffee in my new beautiful room. Oh who am I kidding....I have diapers to change, a baby to feed, and arguments to referee between my older kids!
BEFORE:

DURING:

AFTER:

Subscribe to:
Posts (Atom)